

linux / terminal / cli
Getting Started with Linux: The Fundamentals Every Beginner Needs
I tried every command here on Ubuntu 24.04 LTS and Linux Mint 22. They will work the same way on other Debian-based distributions; if you use Fedora or Arch, only the package manager commands change.
1. What Is Linux, and Why Should You Use It?
If you have never used Linux before, this first heading probably raises a few questions. You might be thinking: “I already get most of my work done on Windows, on an operating system with a decent enough interface, so why bother?” In a way, you are right. But there is another side to consider: “How efficiently am I actually using my resources on this system? How far can I customize it to fit my needs? How fast, easy, and productive can I make my work? And how safe is the personal data I keep on it?” Questions like these tend to pile up.
The best answer to all of them is this: “If you use Linux, none of that is a problem, because you can set up everything exactly the way you want.” Now look at the heading again. :) If that argument made sense to you, we can move on to the question of what Linux actually is.
Linux is an operating system kernel that Linus Torvalds, a Finnish computer science student at the University of Helsinki, started developing in 1991 for use on his own personal computer. The kernel is the layer that sits between the user’s and programs’ requests and the hardware, making sure the computer actually carries those requests out; it shares memory, schedules processes, and manages disk and network access.
But a kernel alone is not an operating system. Combined with the GNU (GNU’s Not Unix) open-source tools, a compiler, a shell, and the basic commands, the kernel forms a complete operating system. Technically this combination is called GNU/Linux, though in modern usage people just say Linux or a Linux distribution. GNU is also, at its core, a philosophy in its own right. I will cover it in more detail in a separate post.
2. Linux Distributions: Which One Is Right for You?
If you have decided to use or try Linux, it is worth starting with a distribution that is easy to use and beginner friendly. What matters here is not that a distribution is “the best,” but that when you run into a problem and search for it, you can actually find an answer. Here are a few options I can recommend:
- Ubuntu Desktop: Easy to use, with a strong community behind it. Ubuntu ships with the GNOME desktop by default and its simple installer and wide software support make it a solid choice for users at every level. LTS releases are supported for five years.
- Linux Mint: Another popular, user-friendly option, Mint stands out for its clean, familiar interface. It ships with Cinnamon, the desktop environment developed by the Mint team, and since it is Ubuntu-based, it has access to a huge software repository. If you are running older hardware, I recommend the lighter XFCE edition instead.
- Zorin OS: An excellent choice if you are thinking about moving from Windows to Linux. Zorin OS stands out for its polished, modern design, is Ubuntu-based, and comes in different editions, such as Core, Lite, and Education, for different use cases.
- Fedora Workstation: A good option if you want the newest versions of your software. Fedora is one of the first distributions to adopt new technologies, and it ships the purest form of GNOME.
There are also versions of each of these distributions built around different desktop environments. As mentioned earlier, Linux is yours to customize as you like; you can switch desktop environments later on, independently of the distribution itself.
If you end up spending a lot of time on Linux and want to grow with it, or if you find yourself thinking, “I want to start from the terminal with no interface and learn the whole system in detail, including disk partitioning, network configuration, driver installation, and setting up a desktop environment,” then I can also recommend a distribution as good as Arch Linux. One caveat, though: do not make Arch your first distribution, because its real value only shows once you already know the fundamentals. :)
A small tip: if you want to try a distribution before installing it, write the ISO you downloaded to a USB drive with Ventoy or balenaEtcher and boot it with the “Try without installing” option. Nothing gets written to your disk this way.
3. The Linux Terminal and Command Line: First Steps
One of the things that makes Linux special is how central the terminal is. The terminal lets you carry out tasks in a more advanced and efficient way than any graphical interface can. Once you get used to using it, you may be surprised at how much time the graphical interface actually costs you, and you may start handling more and more of your work from the terminal. :)
Now open a terminal with the shortcut CTRL + ALT + T (the same shortcut works on most Linux distributions), and let’s start practicing some commands.
Before we get to the commands themselves, I want to mention three habits that will make your life easier:
- The
TABkey: type the start of a command or file name and pressTAB; the shell will finish the rest for you. Press it twice to list the possible options. This one habit prevents most of the typos you would otherwise make. <command> --help: shows a quick summary of how to use the command, ideal for a fast look.man <command>: opens the full manual page for the command. You can search inside it with/and exit withq.
Below is a list of the commands you should know as a baseline. If you want to learn more, take a look here.
pwdprints the full path of the directory you are currently in.ls -allists every file (including hidden ones) in the current or specified directory, along with their details.cd ..moves you up one directory from where you are.cd /takes you to the root directory.cd ~returns you to your own home directory (/home/<user_name>).cd <directory_name>takes you into the directory you specify.mkdir <directory_name>lets you create a new directory. With the-pflag, you can create nested directories in one go.rmdir <directory_name>lets you delete a directory; it only works on empty directories.touch <file_name.extension>creates a new file if it does not exist, or updates its modification time if it does.cp <file_name> <directory_name>copies a file to the location you specify.cp -r <1.dizin_ismi> <2.dizin_ismi>copies the first directory and all its contents into the second directory.mv <file_name> <directory_name>moves a file to the location you specify.mv <old_name> <new_name>lets you rename a file or folder.rm <file_name>lets you delete a file.rm -r <directory_name>lets you delete a directory along with its contents.cat <file_name>prints the file’s contents to the terminal.less <file_name>lets you read long files page by page (exit withq).head -n 20 <file_name>andtail -n 20 <file_name>show the first and last 20 lines of a file.tail -flets you follow a file live.grep "<search_term>" <file_name>lets you search a file for the word or phrase you specify. Use-rto search an entire directory, and-ito search without case sensitivity.find . -name "*.log"lets you search for files by name.nano <file_name>opens a simple text editor that runs in the terminal (CTRL+Osaves,CTRL+Xexits).sudo <script_file> or <program_name>lets you run a command or program with administrator privileges.historylists the commands you have previously typed.man <command_name> or <program_name>brings up a detailed information screen about the command or program.
Important warning: rm has no undo; a file you delete does not go to a trash can. Read the path you type twice, especially when you write sudo rm -rf; a command like sudo rm -rf / or sudo rm -rf ~ deletes your system or all your personal files irreversibly. If you are not sure, try the same path with ls first; whatever list comes up is exactly what you are about to delete.
These commands are enough to get you started with the terminal. There are, of course, many more tools and commands in Linux. Learning all of them will take time, but the more you use them, the more practice and efficiency you will pick up along the way.
4. Files and Directories: The Linux File System
One of the most fundamental traits of the Linux file system is that everything is represented as a file. That means disks, hardware, processes, and configuration all behave like files. To use your disks, for instance, the system relies on a file like /dev/sda1; on the NVMe SSDs that are common today, that file looks more like /dev/nvme0n1p1.
Another important difference: there are no drive letters like C: or D:, the way there are on Windows. There is a single tree, its root is the / directory, and every disk attaches to some branch of that tree. Now let’s look at what the main directories in this hierarchy actually do:
- Root directory (
/): the top level of the file system, and where everything begins. Every other directory sits beneath it. /binand/sbin: hold the basic user and system commands, things likels,mkdir,rm, andmount. On modern distributions these are just symbolic links to/usr/binand/usr/sbin(usrmerge), so they point to the same place./boot: holds the kernel, boot loader (GRUB) configuration, and other files needed while the system boots./dev: holds all device files, such as hard disks and USB devices. Devices are represented as files here./etc: holds the system’s configuration files. For example, DNS settings live in/etc/resolv.conf, and disk mount settings in/etc/fstab./home: holds users’ personal files and settings. Each user gets their own subdirectory (for example,/home/alice)./lib: holds shared libraries and kernel modules. It works something like DLL files on Windows. This directory is also linked to/usr/lib./media: where removable devices like USB drives and SD cards get mounted automatically./mnt: used for file systems you mount manually, on a temporary basis. An external disk, for example, might be mounted here./opt: reserved for third-party software installed outside the repository./proc: a virtual file system that holds information such as system processes, memory, and hardware configuration. You can see your processor’s details, for instance, withcat /proc/cpuinfo./root: the home directory of therootuser. Do not confuse it with the root directory,/./run: holds runtime data that accumulates after the system boots, and gets reset on every restart./srv: holds the data that server services (web, FTP, and so on) expose to the outside./sys: a virtual file system through which the kernel talks to hardware. Values like battery status or screen brightness are read and written here./tmp: holds temporary files. Whatever is here gets deleted when the system restarts./usr: home to most of your installed software; programs, libraries, icons, and manual pages all live in this directory./var: holds system logs, mail, caches, and other files that change over time. The log files under/var/logmatter a great deal for security analysis.
Note: the default permission on users’ home directories can be 755 or 750, depending on the distribution. If it is 755, other users on the system can read the contents of your files. On a personal computer that only you use, that is not an issue, but if you are on a shared machine, I recommend closing off that access with chmod 700 ~.
These basic directories are only part of the Linux file system. To learn more and go deeper, check out this resource or look directly at the man hier page. Remember, the Linux world is a vast ocean waiting to be explored. :)
5. Pipes and Redirection: The Terminal’s Real Power
What really makes the terminal powerful is not running commands one at a time, but chaining them together. Once you learn the four operators below, the terminal turns into a completely different tool for you:
komut > dosya      # Writes the output to the file (DELETES the file's existing content).
komut >> dosya     # APPENDS the output to the end of the file.
komut1 | komut2    # Passes komut1's output as input to komut2.
komut1 && komut2   # Runs komut2 only if komut1 succeeds.
Let’s make that more concrete:
ls -al /var/log | grep "syslog"        # Shows only the lines related to syslog.
ps aux | grep firefox                  # Finds the running Firefox processes.
history | grep apt                     # Brings up the apt commands you typed before.
du -sh * | sort -h | tail -n 5         # Lists the 5 largest items in the current directory.
sudo apt update && sudo apt upgrade    # Runs the second command only if the first one succeeds.
As you can see, combining a handful of commands you already know lets you collapse tasks that would take minutes through a graphical interface into a single line. :)
6. Process and Resource Monitoring
This is the first place to look when your system slows down or a program hangs. The commands below will cover most of your day-to-day needs:
htopis an interactive process and resource monitor. Install it withsudo apt install htop.topis the classic alternative available out of the box on every system.ps aux | grep <name>lets you find a specific process and its PID.kill <PID>sends a termination signal to a process.kill -9 <PID>force-kills a process; treat it as a last resort.df -hshows how full your disk partitions are.du -sh <directory_name>calculates the total space a directory takes up.free -hshows RAM and swap usage.lsblklists your disk and partition tree.uname -ashows your kernel version and architecture.
The -h flag here stands for “human readable,” meaning it shows sizes in MB/GB instead of raw bytes. I recommend using it wherever you see it available. :)
7. User Management: New Users and Permissions
If you are learning Linux for everyday use, you may not need user and group operations very often. Still, knowing the basics matters for system administration, and understanding the permission system is, in a way, half of understanding Linux itself. Below you will find the basic commands for creating, editing, and deleting users and groups, and for managing permissions.
User and Group Operations
-
Creating a new user:
sudo adduser <user_name>This is the method I recommend on Debian- and Ubuntu-based distributions. It creates the home directory, asks you for a password, and handles the default settings on its own. If you want a lower-level alternative, you can also use
sudo useradd -m <user_name>; the-mflag here creates a dedicated directory for that user under/home. -
Setting or changing a user’s password:
sudo passwd <user_name>Lets you set the password for a newly created user, or change an existing one.
-
Creating a new group:
sudo groupadd <group_name>Creates a new group with the name you specify.
-
Deleting a group:
sudo groupdel <group_name>Removes the specified group from the system.
-
Adding a user to a group:
sudo usermod -aG <group_name> <user_name>Adds the specified user to the specified group. Here:
-a(append): adds the user to the new group in addition to their existing groups.-G(group): specifies the group.
Note: if you leave out
-a, the command assigns the user to only the group you specified and removes them from every other group. That can cut them off from audio, network, or disk access, so always use-aGtogether. Group changes also only take effect after the user logs out and back in. -
Removing a user from a group:
sudo gpasswd -d <user_name> <group_name>Removes the user from the specified group. To see which groups a user belongs to, use
groups <user_name>. -
Deleting a user and their directory:
sudo userdel -r <user_name>Removes the user from the system. The
-rflag also deletes the user’s/home/<user_name>directory and its contents.
Permission Operations
Every file and directory in the Linux file system is governed by specific permissions. Permissions determine who can read, write, and execute a file. The images below show how these permissions actually work:
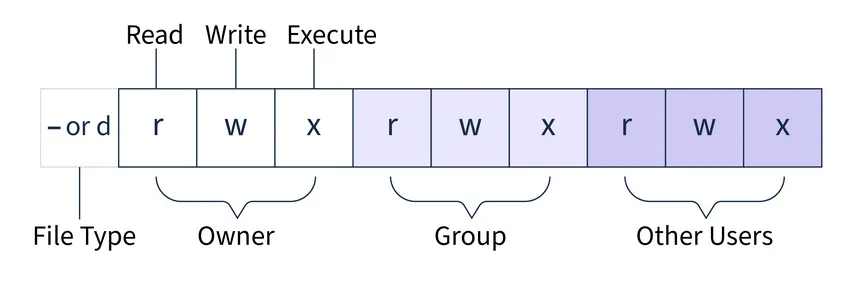
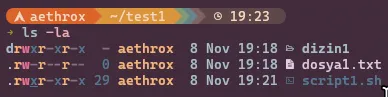
Let’s read a line from ls -l output together:
-rw-r--r--  1  alice  developers  4096  Nov  7 14:22  notlar.txt
│└─┬┘└┬┘└┬┘  │    │        │
│  │  │  │   │    │        └── Group
│  │  │  │   │    └─────────── Owner
│  │  │  │   └──────────────── Hard link count
│  │  │  └──────────────────── Permissions for all other users
│  │  └─────────────────────── Permissions for group members
│  └────────────────────────── Permissions for the file owner
└───────────────────────────── File type
The symbol at the very start of the line tells us the file’s type:
-means a file,dmeans a directory.lmeans a symbolic link (symlink), a shortcut that points somewhere else.bandcmark block and character devices.
Note: let me correct a common mistake here: the 1 in the line is not a symlink indicator. That number is the file’s hard link count, and it is usually 1 for regular files and 2 or more for directories. You can tell a file is a symlink from the l at the very start of the line, not from this number.
Permissions are arranged in three groups of three characters each:
- The first three characters: represent the owner’s permissions.
- The second three characters: represent the group members’ permissions.
- The last three characters: represent everyone else’s permissions.
Each permission is shown with the following symbols:
r(read): read permission (value: 4)w(write): write permission (value: 2)x(execute): execute permission (value: 1)
The sum of the permissions is expressed as a number. For example:
7= read (4) + write (2) + execute (1)6= read (4) + write (2)5= read (4) + execute (1)4= read only (4)
A small but important detail: on a directory, the x permission means “the ability to enter it.” So if you have r permission on a directory but not x, you can list its contents but you cannot access the files inside it.
Managing Permissions and Ownership
On Linux, you change file and directory permissions with chmod, and ownership with chown.
The chmod Command (Changing Permissions)
-
Adding or removing permissions symbolically:
chmod u+x <file_name>   # Adds execute permission for the file owner.
chmod g-w <file_name>   # Removes write permission from the group.
chmod o-rwx <file_name> # Removes all permissions from other users.
chmod a+r <file_name>   # Gives everyone read permission.
Here
ustands for the owner (user),gfor the group,ofor others, andafor all.+adds a permission,-removes it, and=sets it to exactly what you specify. -
Setting all user permissions numerically:
chmod 755 <file_name>What these numbers mean:
7= read (4) + write (2) + execute (1): the owner has full access.5= read (4) + execute (1): group members can only read and execute.5= other users can also only read and execute.
A few patterns you will use often:
644for regular files,600for sensitive files like SSH keys, and755for scripts and programs. If you want to apply a change to an entire directory, use the-Rflag.
Important warning: “I got a permission error, so I will just do 777 and move on” is the most common beginner mistake. This command makes the file writable and executable by everyone on the system. The correct fix is almost always to fix ownership, not to open the permissions all the way up.
The chown Command (Changing Ownership)
-
Changing a file’s owner and group:
chown <owner_name>:<group_name> <file_name>Example:
sudo chown john:developers myfile.txtThis command sets the owner of
myfile.txttojohnand its group todevelopers. For an entire directory, you can usesudo chown -R john:john /path/to/directory.
Together with user and group management, these permissions are a core tool for keeping a system secure. But remember, Linux security is not limited to this alone. I will put together a dedicated post on security later. For now, let’s move on to the next section. :)
8. Package Management: Installing and Updating Software
On Linux, you do not download a .exe from the internet to install software; you install it from your distribution’s signed repository. That is both safer and lets you manage all your updates from a single place.
I recommend starting out with a Debian-based distribution like Ubuntu, since it is quite simple to use. So here, to keep things broadly applicable, I will show how to use the apt (Advanced Package Tool) package manager.
sudo apt updaterefreshes our package repository index, whilesudo apt upgradeupdates every package on the system. Always runupdatebefore installing anything.sudo apt install <package_name>installs a package or program of your choice. To remove a package, usesudo apt remove <package_name>.- If you want to search the repository, you can do that with
apt search <package_name>. For more detailed information about a package,apt show <package_name>will help. Neither of these two commands needssudo. - If you want to remove a package or program completely, including its configuration files, you can use
sudo apt purge <package_name>. - You can also tidy up your system by clearing out dependencies that are no longer needed, with
sudo apt autoremove.
Note: purge does not remove dependencies; it only removes the package itself and its configuration files. The command that cleans up leftover, no-longer-needed dependencies is autoremove. The two are frequently confused.
Let me also answer a frequently asked question here: should you use apt or apt-get? Both work. apt is designed for human use and provides colored output and a progress bar; apt-get tends to be preferred in scripts because its behavior stays consistent across versions. In the terminal, you can comfortably use apt.
That covers our commands. But I want to touch on one more important point. dpkg is a Debian-specific package installation tool. That said, apt is easier and more practical to use than dpkg. If you have downloaded a .deb package from the internet, the cleanest way to install it is still through apt, because it resolves the dependencies for you as well:
sudo apt install ./<package_name>.deb   # Recommended method; it also resolves dependencies.
sudo dpkg -i ./<package_name>.deb       # Lower-level alternative.
sudo apt --fix-broken install           # Completes any dependencies left unresolved after dpkg.
For more information, it is worth checking out this page.
Finally, snap and flatpak deserve a mention. On Ubuntu, some applications (Firefox, for instance) ship as snap packages; these are isolated packages that carry their own dependencies. Flatpak is a distribution-independent alternative, used with the Flathub repository. If a current version of an app is not in your repository, you can usually find it on Flathub. On other distributions the tools differ: Fedora uses dnf, Arch uses pacman, and openSUSE uses zypper.
9. System Updates and Maintenance
System updates and maintenance matter a great deal for keeping a Linux system safe, stable, and efficient. These topics can get complicated, but here I will try to walk through what needs to be done, step by step, without overloading you. There are five important areas for keeping your system healthy:
- Backing up: taking backups should always be a priority, so that any problem or crash on your system does not cost you your data.
- Updating: applying regular updates matters a great deal for closing security gaps and keeping the system more stable.
- Disk cleanup: routine disk cleanup helps improve system performance and use free space more efficiently.
- Security measures and configuration: isolating your system from internal and external threats and tightening security (to whatever degree suits your preferences) matters a great deal.
- Reading and analyzing system logs: reviewing logs is useful for tracking what applications and users are doing on the system, and for catching problems.
A. Backing Up
Backing up is a fundamental step for preventing data loss. The methods you use are entirely up to you, but I recommend keeping at least two different backup approaches.
- First, you can store your backups on a remote server (using tools like duplicity, restic, or rclone, for example) or in a cloud service (Google Drive, Dropbox, OneDrive, and so on).
- Second, you can use a physical backup medium, a portable HDD or SSD. An SSD is the faster option, though it can be more expensive; for a long-term archival backup, an HDD still makes sense.
Recommended tools:
- Timeshift takes system snapshots. It is perfect for rolling back a broken update.
- DejaDup backs up your personal data with encryption and incremental snapshots, and can be scheduled.
- PikaBackup is also for personal data backups; it is Borg-based and has a fairly minimal interface.
I want to highlight a point that often gets confused here: Timeshift is not a personal data backup tool. It is designed to restore the system itself. The ideal setup pairs Timeshift for the system with DejaDup or PikaBackup for your personal files.
Important warning: no matter how big or small the change, always take a backup before running updates, and make sure it actually succeeded. A backup you have not tested does not count as a backup.
B. System Updates
Running system updates matters a great deal for reducing security risk and keeping the system stable. Below are the commands you can use to keep your system up to date:
sudo apt update        # Updates the repository list and checks for the latest versions of installed packages.
sudo apt upgrade       # Updates packages, but does not remove any to keep the system stable.
sudo apt full-upgrade  # Installs every update; may remove or replace some packages if needed.
sudo apt autoremove    # Cleans up the system by removing old packages that are no longer needed dependencies.
Automatic updates: if you would rather not track security patches by hand, you can use the unattended-upgrades tool. Here is how to install and configure it:
sudo apt update && sudo apt upgrade                       # Updates the repository and the packages.
sudo apt install unattended-upgrades                      # Install this package (usually preinstalled on Debian-based distributions).
sudo apt install powermgmt-base                           # (Optional) Makes it behave according to battery status on laptops.
sudo dpkg-reconfigure --priority=low unattended-upgrades  # Enables automatic updates interactively.
sudo unattended-upgrades --dry-run --debug                # Use this to check whether automatic updates are working correctly.
sudo systemctl status unattended-upgrades                 # Check whether the service is running.
The tool’s detailed behavior is configured through /etc/apt/apt.conf.d/50unattended-upgrades. If you want the system to restart automatically after an update, just uncomment these lines in that file:
Unattended-Upgrade::Automatic-Reboot "true";
Unattended-Upgrade::Automatic-Reboot-Time "03:00";
Extra commands (these apply to every systemd service, not just this tool):
sudo systemctl start unattended-upgradesstarts the service.sudo systemctl stop unattended-upgradesstops the service.sudo systemctl enable unattended-upgradessets the service to start automatically at boot.sudo systemctl disable unattended-upgradesdisables the service from starting at boot.sudo systemctl restart unattended-upgradesrestarts the service.sudo systemctl status unattended-upgradesshows the service’s status and most recent logs.
C. Disk Cleanup
Disk cleanup matters a great deal for using free space more efficiently and improving system performance. Be careful while doing it, though: deleting the wrong temporary files can cause problems in your applications or the system itself. So always remember to take a backup first.
The following commands and tools are useful for disk cleanup:
sudo apt autoremove --purgecleans up unused dependencies along with their configuration files.du -sh /var/cache/aptshows the size of the APT cache.sudo apt cleanclears the APT cache completely.sudo apt autocleanremoves old packages that can no longer be downloaded.journalctl --disk-usageshows how much disk space the journal logs are using.sudo journalctl --vacuum-time=7ddeletes logs older than 7 days.sudo journalctl --vacuum-size=200Mkeeps logs within a 200 MB limit.df -hlets you check the result once you are done.
Old kernels can also take up a surprising amount of space over time; sudo apt autoremove --purge usually clears them out. Just make sure to keep at least one previous kernel on the system, in case the new one fails to boot and you need it to get back in.
Duplicate files:
-
You can find and remove identical files with the fdupes tool:
sudo apt install fdupes
fdupes -r <directory_name>   # Lists the duplicate files in the specified directory.
fdupes -rd <directory_name>  # Lets you delete duplicates by choosing, one by one, which copy to keep.
Note: do not use the
-Nflag with this tool; it deletes files without asking you anything.
Graphical tools:
BleachBit frees up disk space by removing unneeded data such as temporary files, caches, and cookies. It protects your privacy with safe cleaning operations and can clear data for many popular applications. It works on both Windows and Linux, and is still actively developed. Just do not tick boxes without knowing what they actually delete.
Sweeper is a simple system cleanup tool for Linux that improves performance by removing unneeded files. It is fast and easy to use, though more limited than more advanced tools. It usually ships alongside the KDE desktop environment.
Stacer is an open-source system monitoring and cleanup tool for Linux. It tracks CPU, RAM, disk, and network usage, cleans up unneeded files, and manages startup applications. Development has stopped, though, so it no longer receives updates and may run into issues on newer releases.
Ubuntu Cleaner cleans up unneeded files, package caches, and old kernels. It is simple and user friendly, but maintained only occasionally.
Honestly, I should say this too: the apt and journalctl commands above already handle most of what these tools do, and more safely. :)
D. System Security
System security matters a great deal, especially for laptop users who spend a lot of time on public networks. Taking basic security measures, particularly firewall configuration, is the first step toward protecting your system from outside threats. The two most popular firewall tools here are firewalld and UFW (Uncomplicated Firewall), and UFW offers a friendlier, simpler setup.
Installing and Configuring UFW (Uncomplicated Firewall)
UFW is a simple, effective firewall tool. It is easy to configure from the terminal, and it manages incoming and outgoing network traffic so that only trusted connections are allowed.
-
Installation:
sudo apt install ufw # Installs UFW (usually preinstalled on Ubuntu). -
Default rules: The settings I recommend for desktop users:
sudo ufw default deny incoming # Rejects every incoming connection to the system. sudo ufw default allow outgoing # Allows every outgoing connection from the system. -
Checking status and enabling:
sudo ufw enable          # Activates UFW.
sudo ufw status verbose  # Shows whether UFW is active and lists the rules.
These few lines are the right default for a typical desktop: nothing gets in from outside, while connections you initiate work without issue.
-
Application permissions: You can allow specific services through, to manage which connections are permitted:
sudo ufw allow ssh            # Opens a service to the outside (or: sudo ufw allow 22/tcp).
sudo ufw allow 8080/tcp       # Opens a specific port.
sudo ufw deny <service_name>   # Blocks a service from outside access.
sudo ufw status numbered      # Lists the rules with numbers.
sudo ufw delete <number>      # Deletes a specific rule.
sudo ufw reset                # Resets all the settings you have made.
Important warning: sudo ufw reset does not just delete every rule, it also disables the firewall itself. Also, before running ufw enable on a remote server, always make sure the SSH port is open first; otherwise you lock yourself out of the server. One more thing: UFW rules apply immediately, so you do not need to reload after every single rule.
UFW’s ease of use is great, especially for beginners. But for more advanced features, firewalld is available, particularly in cases where the network setup is more complex.
Extra Security Measures
Beyond the firewall, there are a few other measures you can take to protect your system:
-
Disk encryption: choosing “Encrypt the new installation” while installing your system, to encrypt your disk, blocks unauthorized access to your data. If you use a laptop, this is the single highest-value security step you can take; even if the device is stolen, your data cannot be read. On modern hardware, the performance impact is negligible, and it does not shorten the disk’s lifespan.
-
Encryption with GPG or PGP: encrypting sensitive files boosts your data’s security. This is particularly useful for sending encrypted emails or files. For a single file,
gpg -c file.txtwill do the job. -
A strong password and automatic screen lock: it sounds simple, but it is the step people skip most often.
-
Installing only from official repositories: random PPAs you find online, and install scripts like
curl ... | sudo bash, are the most common way malware ends up on a system. Never run a script you do not understand.
Reading and Analyzing System Logs
System logs provide critical information for tracking system errors and warnings, and for resolving problems. When something is not working, the answer is almost always here. These logs are accessible through the journalctl command. journalctl shows all the logs collected by the journald service. General commands:
journalctl -f # Shows the logs in real time.journalctl -u <service_name> # Shows the logs for a specific service.journalctl -u <service_name> -n 50 # Shows the last 50 lines for a specific service.journalctl -p err -b # Shows only the error-level entries from this boot.journalctl -k # Shows only the kernel logs.journalctl -b -1 # Shows the logs from the previous boot; very useful for investigating sudden shutdowns.journalctl --since "2024-01-01" --until "2024-01-10" # Shows a specific date range.man journalctl # Opens the detailed man page for the journalctl command.A small piece of advice: when an error message shows up, paste it into a search engine exactly as it appears. In the Linux world, there is almost always someone who ran into the same error before you and wrote down how they solved it. :)
Firewall configuration, encryption, and log analysis are all important basic security measures for keeping your system healthy. You can set up basic firewall protection with UFW, and track system updates and errors with journalctl. These steps matter a great deal for keeping your system safe and running efficiently.
10. Where to Go From Here
If you have read this far, congratulations, you have already taken a real step into the Linux world. You now have the basic knowledge you need to start using Linux. You have learned, step by step, what to do about backups, updates, disk cleanup, and system security.
If you want to keep going, here are a few resources to leave you with:
manpages: the most current and accurate source, and it already ships installed on your system.- Arch Wiki: the best documentation in the Linux world, even if you do not use Arch.
- Ubuntu Server Guide: a good starting point if you want to move into server administration.
- ss64.com/bash: a quick command reference, if that is what you are looking for.
- Bash scripts: combining the commands you have learned to automate your work is the next natural step to take.
One last piece of advice: do not be afraid to break things. Set up a virtual machine, or take a backup, then deliberately break your system and try to fix it. That is the fastest way to actually learn Linux. Remember, Linux is a powerful and flexible system, but the learning process takes some time. Be patient, do not be afraid of making mistakes, and keep learning by exploring.
With this post, I wanted to make it easier for you to take your first steps into the Linux world. I hope it was useful, and that you enjoyed reading it. Since this is also my first comprehensive post, there are bound to be a few typos and mistakes here and there; your comments and feedback on that would be very welcome. Please do not hesitate to share your thoughts. See you in the next post, take care!